

 While you can run a .ps1 file on agent via an External EXE Check remote monitor – it requires that you have copied the files over ahead of time to the target computer’s C:\Windows\ltsvc directory. That isn’t always convenient and requires custom script to transfer the .ps1 file in addition to your monitor.
An easier method is utilizing the Executable/Arguments line to populate full path to the powershell.exe and arguments – if you can structure into single line format.
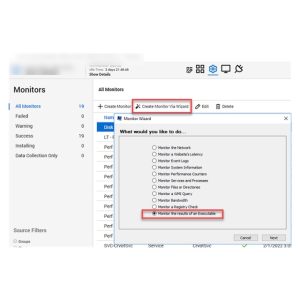
For example, running the “Create Monitor via Wizard” from the Monitors tile of an agent – you would select Monitor the results of an Executable.
 And in the next window rather than select an Executable to Run from the LTShare Presets that works for vbs, bat and cmd files – instead you can paste into the Executable/Arguments line instead when using PowerShell.
This example is using PowerShell to check the activation status of Windows:
%SystemRoot%\system32\WindowsPowerShell\v1.0\powershell.exe “(Get-CimInstance SoftwareLicensingProduct | Where-Object {$_.Name -like ‘*Windows*’} | where {$_.PartialProductKey } | select LicenseStatus | ft -HideTableHeaders | out-string).Trim()”
 In the next window of the wizard, we will monitor for Result Equals 1.
Then you can finish the monitor wizard selecting your desired frequency, alert template/ticket category and monitor name.
If result of the query is not 1 – the monitor will trigger a failure alert. You can also use the Test button to return value before the monitor fires first check after installation.
 When Windows is not activated normally a 5 is returned as in this example.
Best practice is to create remote monitor on single agent for testing purposes. Then once you have validated monitor working as expected – you can use the Send To option to place on a group. Just right click on the monitor and choose Send To>Groups to bring up the group selection list.
 Visit the group level remote monitor to make any further adjustments. For example, during testing you might use Default – Raise Alert but then on the group use the Default – Create Automate Ticket alert template. Then once your group-based remote monitor has installed on the agent you initially created/tested monitor on – then you can remove the local test monitor.